Member Administration
 Reference Guides
 Tutorials
 HTML
HTML CSS
CSS Javascript
 FAQ
FAQ
Uploading and using images on DataPitStop is very easy. There are several benefits to the way
we do things over standard conventions. The first and foremost benefit is not having to
rely on FTP to transfer your images to your site. You don't need to configure an FTP client
for every computer. Also, there is not a password special password that needs to be remembered.
Everything is web based. All image uploads can be done from anywhere without special
requirements or specific configuration to the computer you are working on.
Another benefit is the way in which you upload and use images. The same procedure is used no matter if your creating a new web page, adding a new employee to your Staff Directory, adding a new News Article, or adding a new Calendar Event. You learn how to do it once, then apply it to all other aspects of your DataPitStop site. The following is a tutorial on how to upload and use images. When you are done with this tutorial, you will have all the tools needed to use images on your site.
Another benefit is the way in which you upload and use images. The same procedure is used no matter if your creating a new web page, adding a new employee to your Staff Directory, adding a new News Article, or adding a new Calendar Event. You learn how to do it once, then apply it to all other aspects of your DataPitStop site. The following is a tutorial on how to upload and use images. When you are done with this tutorial, you will have all the tools needed to use images on your site.
OverviewUsing images on DataPitStop can be either a 1 or 2 step process, depending on how you want to use images on your site. The main thing you need to understand is that as soon as you upload an image, it is visible on the page. You do not need to do anything special for the image to show up. This is the standard image placement. The other process involves uploading the image, then embedding the image on your page. The following is an overview of each process.
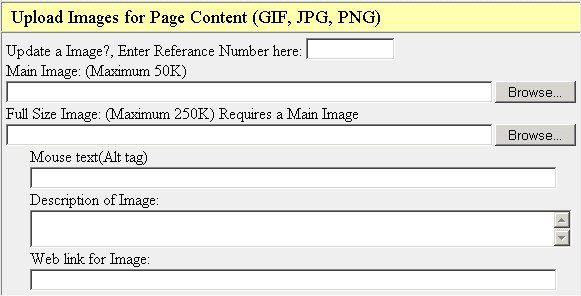
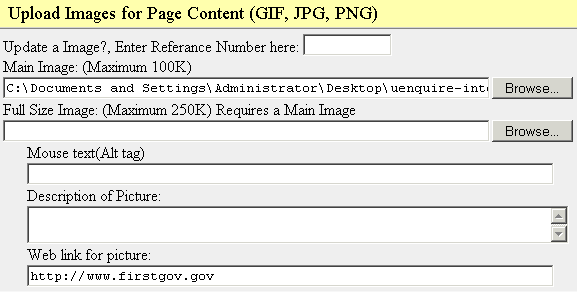
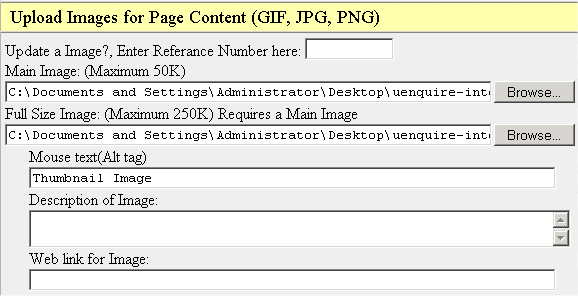
One other feature we have included in our imaging system are thumbnails. Whenever you upload an image, you have the option of uploading a "Full Size Image" along with it. This gives you the ability to upload a thumbnail image, then the full size image to create a thumbnail. The biggest benefit of this is that all the linking is done for you. The thumbnail is automatically linked to the full size image. No further action needs to be taken. Other features worth mentioning are Alt tags, web links, and picture descriptions. Alt tags are simply the text that pops up when you place your mouse over an image. I'm sure you've all seen this. Web links simply turn your image into a web link, with the link being of your choosing. For example, you could upload a company logo of one of your affiliates, then make it a web link that links to their web site. Finally, you may give your image a description. When you give your image a description the image automatically becomes a link to a page that contains a description of the image. Uploading ImagesUploading images couldn't be easier. We will start off with the basics here. To upload an image, you need to scroll down to the section normally, but not always, labeled "Upload Images for Page Content (GIF, JPG, PNG)." Here is an image of the upload window, accompanied by a brief description of each option.
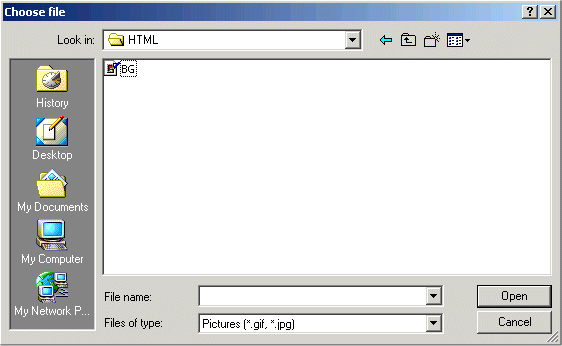
You will notice there are 2 places to choose an image. You must always have a Main Image. The Full Size Image is optional. You want to start off with clicking the browse button next to the box labeled Main Image. An image like the following will pop up (if you are a windows user):
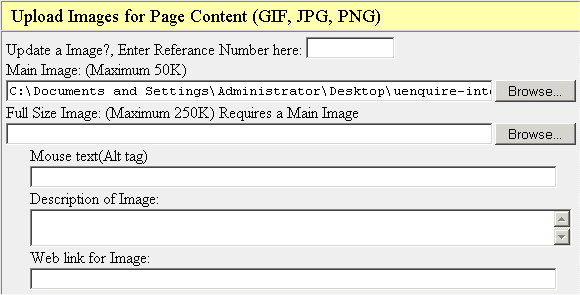
You need to locate your image, select it, then click the "Open" button at the lower right hand side of the window. Once you do this, you will be back on your web page and will see the full path of the image you just selected.
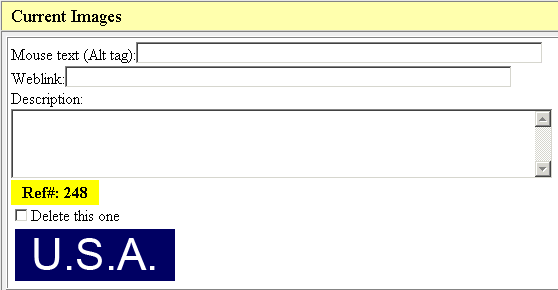
At this stage, this is all you have to do to upload the image. Everything else is optional. You simply need to click the "Save" button located at the bottom of the page. As mentioned above, you may also take advantage of the other features provided by our imaging system however you will have to keep reading in order to get a better understanding of them. At this point, if all went well, your image should be uploaded. If you go back into your edit page, you will see the image listed under the section labeled "Current Images." Here is an image that I uploaded along with descriptions of what items can be changed.
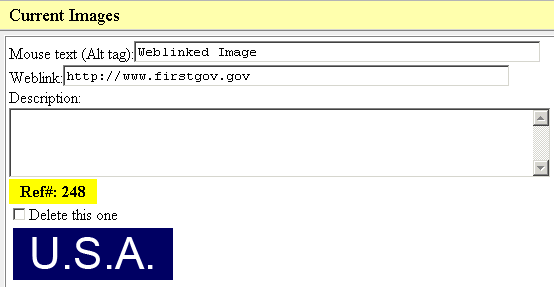
If you have more than 1 image uploaded, they will sequentially be listed here. That wasn't hard, was it? There isn't a lot to uploading images. We didn't go to deep into any options but the following sections will so keep reading. Using an Image as a WeblinkAs mentioned above, you can have your image be a web link to another, external, web site. This is easily accomplished. You can do this when you initially upload an image, or you can do it after an image is already uploaded.We walked through the process of uploading an image above. When we want to create a weblink, we follow the same process with one exception. After we choose the image we want to upload, we need to specify the URL (weblink) we want to link to. Look at the following image.
Notice that all we did was select the image, then in the "Weblink" box enter in the web address we wanted to link to? Here is what we created above. If you click on the picture it will take you to http://www.firstgov.gov.
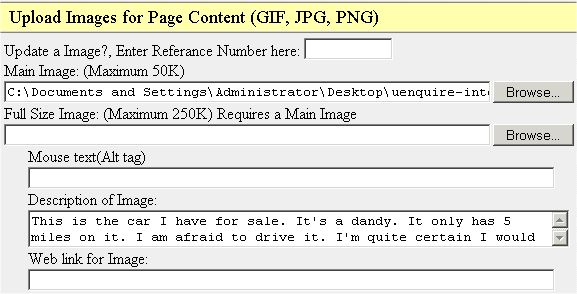
As previously mentioned, you can also turn the image into a weblink after you have uploaded it. You simply have to add the weblink information for the image under "Current Images." Image DescriptionsImage Descriptions are best described with an example. Lets say you have an images of several cars you are selling. You decide you want to show images of all your cars, and you want the images to be links to pages giving a description of a car. You can easily do this with Image Descriptions.The first thing you need to do, like always, is select a picture. Along with the picture you need to give your picture a description like the following.
Notice how the description was entered into the "Description of Picture" box? When you are done you need to click the "Save" button at the bottom for the change to take effect. This is all that has to be done in order to create a web link. Here is the result of what I just created.
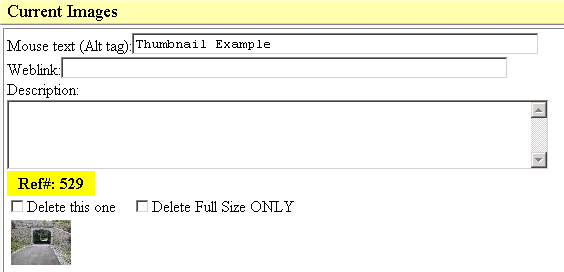
As with everything else, you can change the description after you initially upload the image. You can either change the description or you could completely remove it. If you choose to remove it, the image no longer has a link to a description page. It becomes a regular image. Creating Thumbnail ImagesIt is very easy to create thumbnails on your site. Please note that you must already have a thumbnail image and a full size image. The following will walk you through the process.You must first upload both the thumbnail image and a full size image. The following image shows you the 2 boxes involved.
Notice how we selected images for both "Main Image" and "Full Size Image"? The small image, or thumbnail, needs to be selected for "Main Image." The large image, or full image, needs to be selected for "Full Size Image." All you need to do now is click the "Save" button at the bottom of the page. Here is an example of what I uploaded.
There is 1 difference when dealing with thumbnail images. Under "Current Images" there is a new option. The new option looks like the following.
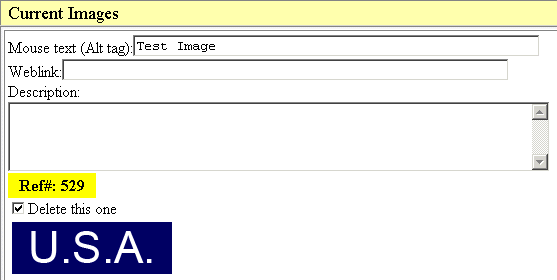
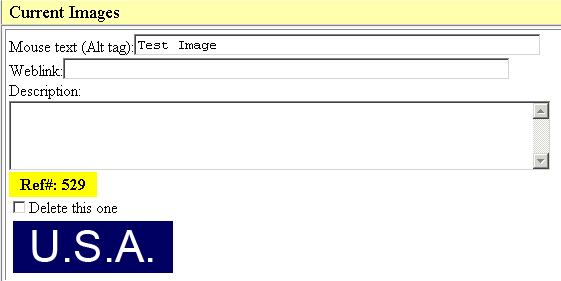
Notice the new option "Delete Full Size ONLY"? Like it says, if you click the box and click "Save" it will delete the full size image. Once you do this your "Main Image" becomes a regular image. There is no longer a link on the image. Make note that if you click the box "Delete this one" and click "Save", both the thumbnail and the full size image will be deleted. Updating ImagesAs you have seen so far, whenever you upload an image, you can at any time change it's attributes under the "Current Images" section for the image. This is true for all aspects except one. You are able to update the image itself, but you have to do it at the top where you upload images.Lets use an example to illustrate this. Lets say we have a picture already under "Current Images". It looks like the following.
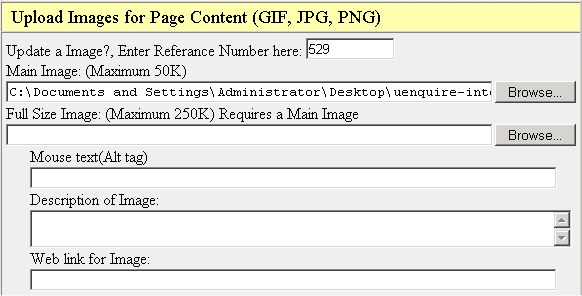
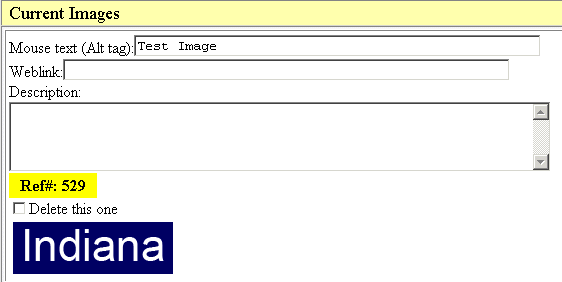
We decide to replace the image with another one. The problem is we like the placement of the image on our page. We don't want to delete the image and upload another. What we need to do in this situation is the following. Note the "Ref#529" above. This is our images reference number. We need to go up to the top of the page, like we are going to upload a new image. We need to place the reference number in the box labeled "Update a Image?, Enter Reference Number here". Here is an image.
Notice that along with entering in the reference number of the image we want to change, we also selected a new image to upload. This will replace the image with reference number 529 with what we selected with the "Browse" button. Here is what our "Current Images" looks like now.
Our image is changed but we still have the same reference number, Alt tag, etc. Please note, as mentioned above, the only time you need to enter in the reference number is when you are updating the image itself. You do not need to do this when you want to update the Alt tag, Weblink, or Description. What about thumbnail images? These are updated in the exact same was as illustrated above. You must, however, update both the small and large images at the same time. If you only want to update the "Full Size Image" and leave the "Main Image" the same, you MUST enter the reference number and upload both the "Main Image" and "Full Size Image." You cannot update just the "Main Image" either, you must update both at the same time. Placing Images- Standard Image PlacementWhenever you upload an image, by default it uses our standard image placement. As mentioned above, as soon as you upload the image, it will show on your web page. Where does it show? Standard image placement places the image(s) at the bottom of your page (or Calendar Event, Staff Directory Entry, etc). If you were to upload 20 images and used standard placement, they would appear from left to right until the visitors browser would wrap the images. In short, the placement depends on the visitors resolution. If you would like a good example of standard image placement, please visit this page. That should give you a good idea of what this does. This is by far the easiest method to use because it does not require anything besides uploading the image. This is the reason we choose to include this option.Placing Images- EmbeddingEmbedding images, in short, is the process of placing images on your page wherever you want them. This is what you normally do when you create a web page. You have a picture, some text, then another picture, some text to the right of the picture, etc. Embedding images gives you full control of image placement.We have created 2 new tags that will enable you to embed images. Both are easy to use and one of them even makes placing images on your page easier than standard HTML methods. The following will walk you through the usage of these 2 new tags
Deleting ImagesDeleting images is extremely easy. All you need to do is locate your image under "Current Images", and click the box labeled "Delete this one". After you have done this you need to click the "Save" button at the bottom. You also need to make sure to remove any references of your image if you used the UPLOAD or FILENAME tag in your HTML code. You will not be able to remove the image until you do.
|
||||||||||||||||


 This is my sample text that should be on the right side of the image.