|
|
Dealing with web pages and menu items may seem a bit complex. It really isn't. I
highly suggest read the "Overview" on how web pages
work. You can locate the document here if you have not read it.
It will outline some of the terms used
here, as well as give you an overall understanding of how everything works. You
will soon realize it is not difficult, and is quite flexible.
This document will walk you through adding and editing a web page. The way they
are done is the same. The only thing that differs is how you select them. To ADD
a new web page you have to choose "Add New Menu Item" from the top of your
Administration Page. To EDIT an existing web page you have to select it from under
the "Current Web Pages" section on the Administration Page. The following is an
illustration on how this is done.
To ADD a page, you need click on the "Add New Menu Item" button at the top of your
Administration Page.
CLICK "Add New Menu Item" TO ADD A NEW WEB PAGE
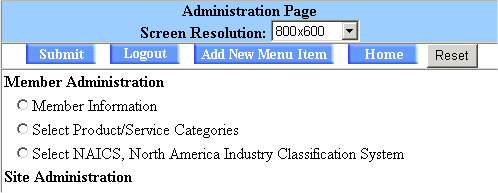 |
If you want to EDIT an existing web page, you need to select the correct page from under the
"Current Web Pages" section close to the bottom of your Administration Page.
CHOOSE PAGE TO EDIT
 |
One final note about web pages and menu items. You can do much more than just add a standard web page.
You can use one of our ready made modules, such as a Staff Directory or Calendar. You can set a
page refer. You can even make your page a link to an external web site. All of these features do not
require you to use HTML.
You also have several options to choose from when dealing with the way your web page is listed
on your menu. You can hide or disable menu items. You can specify the page to be a standalone page.
This removes your page header and menu from the page. You can even give you menu item a special button
or menu bullet.
The following will walk you through each section of the ADD/EDIT page. It will show you how to take
advantage of the options discussed above as well as introduce a few more to you. When you are
done reading this document you will know everything you need to get started creating custom web
pages.
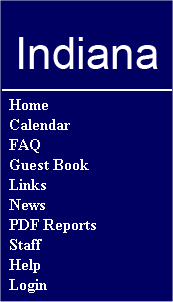
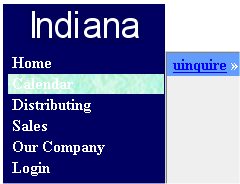
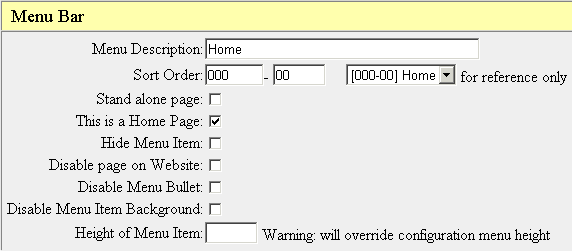
Menu Bar
This section deals with your web page's menu item. For clarity, this
is what a menu looks like.
By default, when you add a new web page, it will show in your menu. This section
enables you to manipulate your web page's menu item. The following is a screen
capture of the Menu Bar section and follows with an explanation of what each
option enables you to do.
 |
-
Menu Description:
The Menu Description is the name of your web page. Whatever
you enter into this box will be the name on your menu, i.e.. the name of your web page.
-
Sort Order:
The Sort Order deals with the order and arrangement of your web page
on your menu. You can place the web page anywhere you wish on your menu. You can even
create sub menus. The specifics of how Sort Order works is not described in this document.
I highly suggest you go here to get additional information. Arranging your menu items is
easy, it just needs a little more explanation.
-
Stand alone page:
This creates a standalone web page. What this means is that the web
page will not have your menu or page header on it. When a visitor click on the web page from
your menu they will be taken to your page, but they will no longer see your menu or page header.
-
This is a Home Page:
This option is very simple. When someone visits your web site, they
will be taken to a page. An example is if you visit http://datapitstop.us. What page do you go to?
Our home page is the United States map. Every time someone visits http://datapitstop.us they end up
there. This option give you the ability to set any of your pages as your home page. Keep in mind
you only want to choose 1 page to be your home page.
-
Hide Menu Item:
This option enables you to hide your web page on your menu. Keep in mind that
the page is still there and active, however when a visitor visits your site they will not be able
to see it. They will not know of it's existence.
How can I use the page if it's hidden? If you can't see it on the menu you can't get to it, right?
Wrong. The easiest way for you to get to it is do the following. Create the web page, but don't hide it. Go back
to your home page. You should see it in your menu. Click on it. Once you are on the page, bookmark
it with your web browser. Now, you want to go back and edit the page. Select this option to hide it.
Now you have a way to access your hidden page. The other way you can do this is figure out how we
URL encode our pages. For most people the first way explained is easiest.
OK, I have a hidden page but why on earth would I want to do this? There are many reasons. For starters,
when you are in the process of creating a web page, you may not want to show the page to the public
until it is finished. This will allow you to do this. You can even send the bookmark to others
and have them review it before you "un-hide" it. As far as other reasons, there could be numerous.
It it is up to you to decide if you want to do this.
-
Disable page on Web Site:
This option is somewhat like hiding your web page. When you choose
this option, the page still exists. The difference is that it is DISABLED, meaning you CANNOT get
to it. Once it is disabled, the only way you can view it is to uncheck this option again.
-
Disable Menu Bullet:
This option only takes effect if you uploaded, and are using, Menu
Bullets for your entire web site. You will know if you are because you had to upload them
in the "Configuration Settings" section under "Site Administration" on your main Administrative
Panel. This option disables the Bullet for this menu item ONLY. All other menu items are left intact.
-
Disable Menu Item Background:
Again, this option only takes effect if you are using a
Menu Item Background. You will know if you are because you had to upload it
in the "Configuration Settings" section under "Site Administration" on your main Administrative
Page. This option disables the Menu Item Background for this menu item ONLY. All other menu
items are left intact.
-
Height of Menu Item:
On the "Configuration Settings" section under "Site Administration" on
your main Administrative Page, you had the option of setting your Menu Item Height. This will
override the height for this menu item ONLY. All others are left intact. You can make it larger
or smaller, bringing more emphasis to the menu item. The choice is up to you. Just like for your
global menu height, this is specified in pixels.
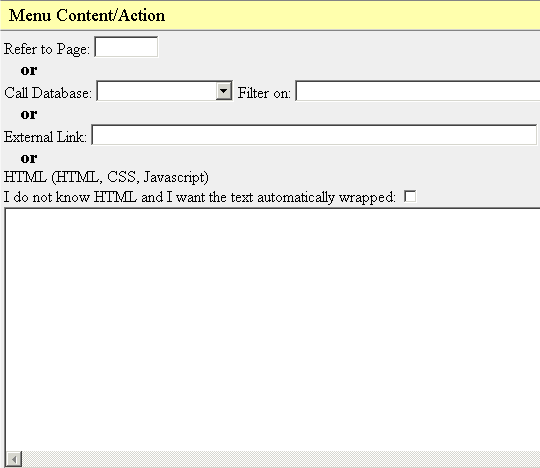
Menu Content/Action
The Menu Content/Action sections deals with your actual web page content. This section has
4 different, distinct functions for you to choose from. The following is a screen capture of
the Menu Content/Action section along with a description of the 4 functions. Keep in mind
you can only choose 1 function for your web page. If more are chosen, the highest one
on the list is used.
 |
-
Refer to Page:
If you read the documentation on how menu items are organized, you
will be familiar with the Page Refer. With this option, you can enter in a Page Refer that
refers to another one of your pages. In short, if you enter in a Page Refer, when someone
clicks on your web page's menu item, it takes them to the page that you are referring to.
Why would you want to do this? The main purpose of doing this is in the use of sub menus.
If you create a sub menu, you may want the first level menu to refer to your home page. That
way, when someone clicks your first level menu, the second level sub menus appear, but your
still on your home page. For more information on sub menus and how to create them, please
refer to the documentation on Sort Order.
As with other modules, you do not need to use sections for HTML, Images, or PDFs. If you enter
anything in the HTML window, upload an image, or upload a PDF, they will be ignored and will
not show on your page. The only section you may want to change is the last one,
"Upload Images for Menu Item (GIF, JPG, PNG)". That section is described further down in this
document.
-
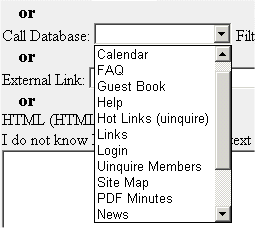
Call Database:
Call Database refers to one of our built in modules. You have many to
choose from. All you have to do is click the down arrow and select the feature you want to
add. Here is a screen shot of the drop down menu.
This is all you have to do to select a module. Ignore the "Filter On" option, it is mainly
for internal use. One last thing to note is the "Menu Description" under the first section
"Menu Bar". Just because you are adding the a Calendar to your web site, the name you
give for your "Menu Description" still stays true. For example, you could choose to add a
Calendar, and give it a name of "Schedule of Events". It is completely up to you.
As with other modules, you do not need to use sections for HTML, Images, or PDFs. If you enter
anything in the HTML window, upload an image, or upload a PDF, they will be ignored and will
not show on your page. The only section you may want to change is the last one,
"Upload Images for Menu Item (GIF, JPG, PNG)". That section is described further down in this
document.
-
External Link:
This option is very simple. It enables you to create a menu item that
links to an external web site. All you need to do is enter in a URL in the "External Link"
box to create the link. The end result is a new menu item that when clicked, will take the
visitor to the URL you specified.
As with other modules, you do not need to use sections for HTML, Images, or PDFs. If you enter
anything in the HTML window, upload an image, or upload a PDF, they will be ignored and will
not show on your page. The only section you may want to change is the last one,
"Upload Images for Menu Item (GIF, JPG, PNG)". That section is described further down in this
document.
-
HTML (HTML, CSS, Javascript):
If you want to create a new web page using HTML, CSS,
Javascript, images, or PDFs, then this is the option you want. This will enable you to create
a traditional web page. You may also create the page with a HTML editor, such as Macromedia
Dreamweaver or Microsoft Frontpage, then copy and paste the HTML code into this window.
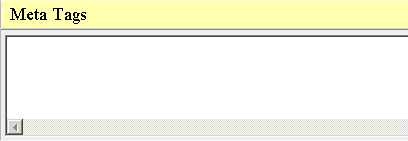
Meta Tags
This box lets you enter Meta Tags for your web site. Meta Tags are information inserted into
the "head" area of your web pages. These are not seen by your visitors but instead are used
to communicate information to other sources. Meta tags can be used to tell the visitors
browser what character set you are using. They can also be used, to some degree, to describe
the content on your pages to a search engine. Unlike your global Meta Tags, which are specified
on the page "Configuration Settings" under the "Site Administration" section on your Administrative
Page, these are specific to your current web page.
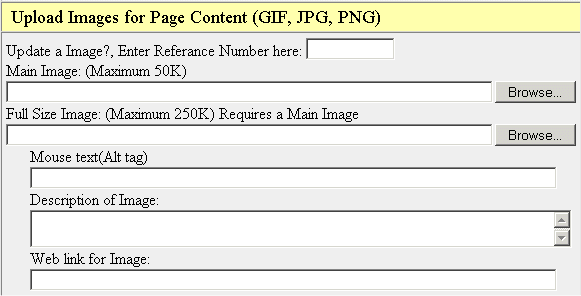
Upload Images for Page Content (GIF, JPG, PNG)
This section allows you to upload images for your FAQ. For specifics on
how to use images, please see the corresponding tutorials.
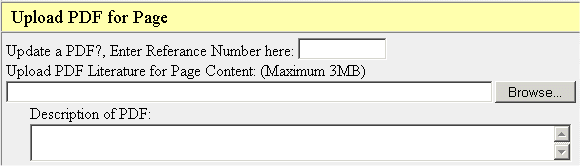
Upload PDF for Page
This section enables you to upload PDFs for your FAQ. For additional information
on how to use PDFs on your site, please see the corresponding tutorials.
Current Images
This lists your current images. The images listed under this section are the images
that will show on your page. For additional information on how to use images on your web site, please see
the corresponding documentation.
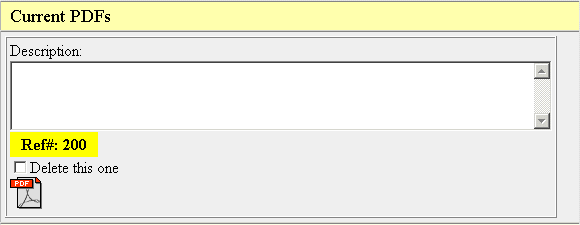
Current PDFs
This section shows your current PDF documents. The PDFs listed here will show on your
web page. For additional information on how to use images on your web site, please see
the corresponding documentation.
Upload Images for Menu Item (GIF, JPG, PNG)
This section deals strictly with your Menu Items. Again, for clarity, here is what your
menu looks like.
You can upload a bullet, button, or a background for you menu item here. This following is
a screen capture of what this section looks like as well as a description of each section.
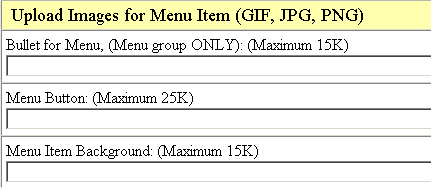 |
-
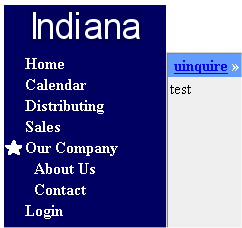
Bullet for Menu (Menu group ONLY):
This enables you to set a bullet for the current
web page only. Also note the bullet only applies to first level menu items. Sub menus will
not inherit the bullet. In fact, you cannot use bullets at all with sub menus. Here is an
example of a bullet uploaded for a page. It also shows that sub menus will not inherit the bullet.
-
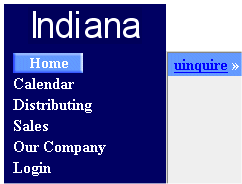
Menu Button:
This option lets you upload a menu button for a web page. When you upload
a button, it replaces your menu item name as specified by the "Menu Description" box. Unlike
menu bullets, buttons can be used for sub menu items. Here is an example of a menu button for
my "Home" page.
-
Menu Item Background:
This option enables you to use a background image for your
menu item. If you specified a global background for your menu items on the "Configuration
Settings" page, this will override it. Here is an example of what uploading a Menu Item
Background does.
Deleting a Menu Item
Deleting a menu item is very easy. At the bottom of the page you will see something
like the following.
All you need to do is click the box labeled "Must check this box if you wish to
DELETE this menu item", then click the DELETE button on the right.
|
 Member Administration
 Reference Guides
 Tutorials
 HTML
HTML CSS
CSS Javascript
 FAQ
FAQ